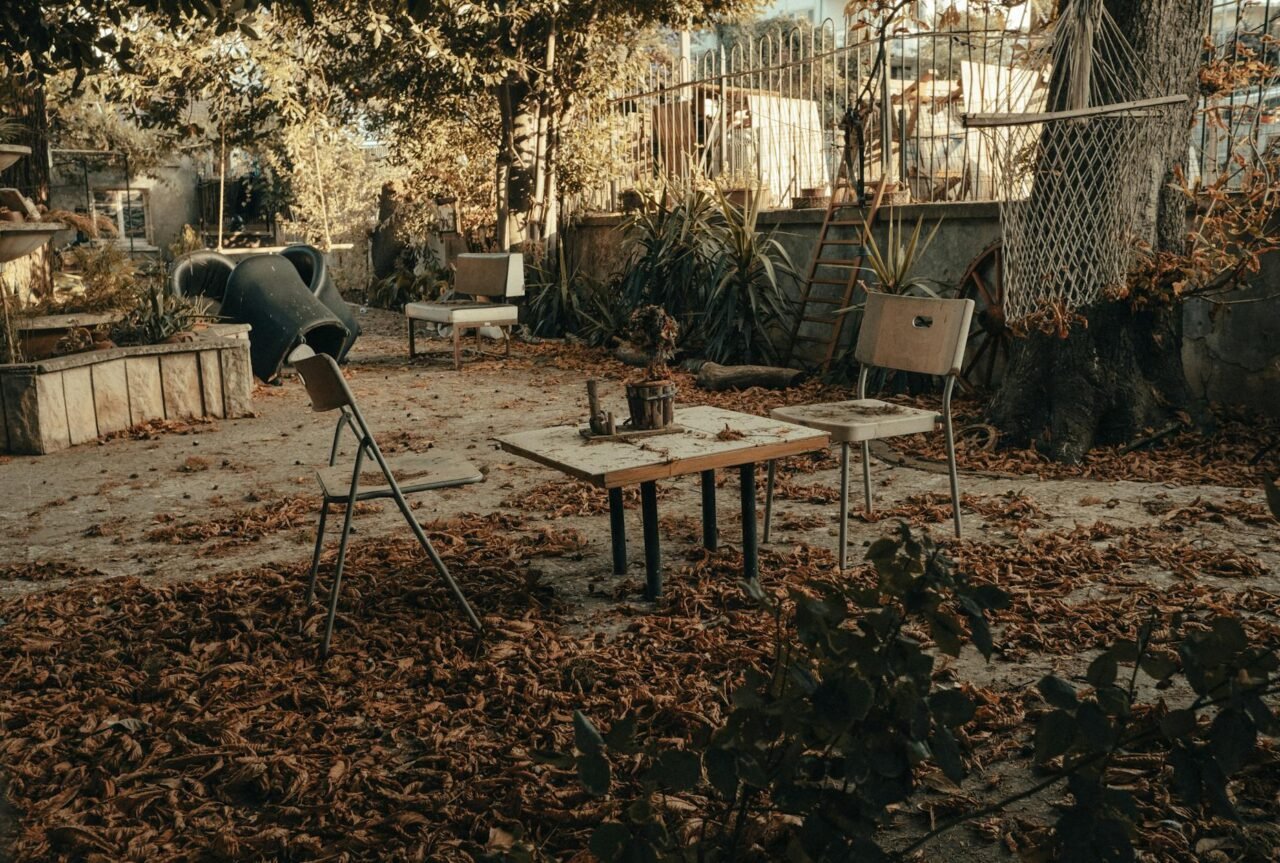
Turning a neglected garden into a seasonal success starts with a clear read of the site and a realistic plan. The air often smells of damp leaf litter and old wood; you may notice compacted paths that rain turns to mud and a few remnant perennials that tell you what the spot likes.
The benefit is quick: visible access and usable beds within one season if you prioritize soil and water first.
Assess the site, then set seasonal goals
A quick walk at 9–11 a.m. and again at 2–4 p.m. reveals how sun and shade fall across the year. Note drainage low spots, repeat puddling after rain, and which weeds dominate; those are clues to soil compaction and nutrient patterns. Photograph and sketch the site; annotated photos save guesswork when you place beds and paths.
Decision points: what to keep and what to remove
- Keep plants that reduce future work: deep-rooted perennials, healthy shrubs, and nitrogen-fixing species. You’ll feel at home if a plant flowers reliably and has a solid crown.
- Remove aggressive invasives and shallow: rooted saplings that will re-sprout and demand ongoing control.
- Map problem species and utilities before major removals: a simple photo with markings prevents costly mistakes and helps plan staging.
Trade-offs: retaining borderline plants saves time now but may cost extra pruning for two seasons. Removing everything creates an exposed site where weeds and erosion rush in; staged removals over a season reduce that risk.
Clearing with safety, timing, and waste strategy
Major pruning and tree removal are best in late winter to early spring when plants are dormant and nesting birds are less likely to be present. Avoid heavy cuts during peak nesting (roughly March–August in many regions). Clearing annual weeds is most effective late spring before seed set.
Tools and disposal
- Basic kit: folding saw, long-handled loppers (12–36 inches), heavy gloves, eye protection, and a dust mask for dry work.
- Stubborn roots: a reciprocating saw helps on larger roots; rent a chipper for woody material over 2 inches, or hire green-waste removal.
- Reuse options: small woody piles can be aged into mulch; larger volumes work for paths after composting. Avoid fresh chips against stems to prevent rot.
What people miss: removing a dense bramble field in one weekend feels satisfying but often leaves a shallow root mat that resprouts; plan for staged removal and repeated follow-up.
Soil rescue: testing, amendments, and low-disturbance approaches
Soil quality drives results more than plant choice. Start with samples from 3–5 spots and test for pH, organic matter, and basic nutrients. If pH is outside 6.0–7.5 for general garden plants, correct it per lab advice. The honest trade-off: aggressive digging speeds short-term establishment but damages soil structure; no-till requires patience and more organic inputs.
Practical rebuilding steps
- Top-dress beds with 2–4 inches of well-matured compost: repeat annually until tilth improves.
- Use a sheet: mulch method—cardboard or newspaper (2–3 sheets) under 3–4 inches of coarse mulch—to suppress weeds without uprooting soil life.
- Broadfork or double-dig only small: high-value areas where clay compaction prevents drainage; choose broadforking to preserve soil horizons and microbes.
- Install a simple compost bin to return green waste to the beds—see How to Build a Simple Compost Bin at Home for a straightforward plan.
Why this works: compost feeds soil biology and releases nutrients slowly; layered mulches suppress weeds while allowing water infiltration. Limitations include persistent perennial roots such as bindweed or horsetail, which may need repeated physical removal, solarization, or targeted chemical control if you choose it.
Sunlight, watering, and microclimates: place plants where they will thrive
Mapping microclimates—warmer corners by a south wall, frost pockets in hollows, reflective heat off paving—helps avoid planting mistakes. A sheltered corner can be 2–4°C warmer and useful for starting tender crops earlier.
Grouping and irrigation choices
- Group by light: full sun (6+ hours), part sun/part shade (3–6 hours), shade (under 3 hours). This reduces mismatches and dead zones.
- Group by water: keep drought-tolerant Mediterranean herbs separate from consistently moist vegetables and ferns to simplify irrigation.
- Irrigation: drip systems for beds, soaker hoses for long borders, and short-run sprinklers for lawn patches. Drip systems reduce foliar disease and save water; add pressure regulators and basic filters to avoid clogging.
- Spacing: follow mature spread, not pot size—space perennials 18–36 inches apart and shrubs 3–6 feet apart based on expected mature width.
Drip systems cost more upfront but save time and water across seasons. Hand-watering remains flexible but inconsistent; if using it, adopt a schedule tied to plant types—heavy feeders every 2–4 days in warm periods, drought-tolerant groups every 7–10 days.
Design and planting plan for seasonal interest and produce
Design with simple sightlines, paths, and a backbone of low-maintenance perennials. Skip over-complex patterns if maintenance is limited; a few strong elements read better from the house than many underperforming bits.
Combining structural and seasonal elements
- Backbone perennials: ornamental grasses, salvia, catmint, and sturdy shrubs provide year-round form and reduce annual work.
- Seasonal rewards: bulbs like daffodils and muscari provide early spring color and naturalize with little care.
- Edibles: two to three raised beds (4×8 feet) easily supply salad greens, herbs, and a handful of tomato plants in a small family plot.
- Succession planting: sow early peas, follow with quick summer lettuces, and finish with autumn brassicas to keep beds productive.
Example scenario: a 600-square-foot suburban back garden with morning sun and partial west shade. Keep a healthy cotoneaster and a clump of daylilies, remove invasive euonymus, install a4×12-foot raised bed for tomatoes, and lay a 3-foot gravel path for access. By Year1 you’ll typically see improved access, two tomato harvests, and better soil tilth after annual compost.
Pest, disease prevention, and a seasonal maintenance rhythm
Neglected sites often hide root disease pockets and pest reservoirs. Prevention is less work than a cure. Establish a weekly monitoring habit during the growing season and act early with low-tox options.
Practical controls and calendar
- Inspect under leaves: at stem bases, and at the soil surface once a week during active growth.
- Use physical controls first: remove infected material, hand-pick slugs at dusk, and use barriers or traps for common pests.
- Biologicals: Bacillus thuringiensis for caterpillars and beneficial nematodes for soil grubs are effective with low collateral damage.
- Rotate vegetables by family annually to reduce soil-borne disease build-up; rotate Solanaceae, brassicas, and cucurbits when possible.
| Season | Key Tasks | Timing |
|---|---|---|
| Late winter | Prune dormant shrubs, soil testing, and apply compost | February–March |
| Spring | Plant perennials/bulbs, set up drip irrigation, and sow cool-season crops | March–May |
| Summer | Mulch, monitor pests, deadhead, water deeply | June–August |
| Autumn | Clear spent growth, add finished compost, plant trees/shrubs | September–November |
Common disease triggers include overcrowding, poor airflow, and overhead watering—spacing and drip irrigation directly reduce those risks. When problems are widespread, consult local extension recommendations for fungicide choices and cultural controls.
Common Mistakes
Clearing everything immediately: removes wildlife shelter and exposes soil to weeds and erosion—stage removals instead.
- Skipping soil tests: guessing pH or nutrients wastes money and time; a lab test is a small investment compared with repeated corrective measures.
- Planting to fill space rather than to mature size: small nursery plants will crowd and compete later if spacing is ignored.
- Failing to zone irrigation: mixing thirsty edibles with drought-tolerant shrubs leads to poor results for both.
- Piling mulch against stems: leave a2–3 inch cleared ring to prevent rot and rodent damage.
Realistic example:25×30 ft overgrown plot converted to seasonal garden
A 25×30-foot backyard with compacted clay, morning sun, and a thick ivy mat on the west side. Plan: keep two hardy shrubs, remove ivy and self-seeded saplings in March, test soil, install two4×8 raised beds, create a 3-foot gravel path, zone drip irrigation separately for beds and shrubs, and lay 3 inches of aged wood-chip mulch on borders.
Outcomes by the end of Year 1: raised beds produced continuous salad greens and five tomato plants that fruited mid-summer; perennials reduced annual weeding by 40–60 percent; soil organic matter rose after adding about 6 cubic feet of compost and following a mulch program.
The honest trade-off: initial costs for beds and fittings (rough range USD200–600) returned in easier watering and better yields.
Short, lived-in observations
The first warm day after mulch goes down, the garden often smells like damp earth and wood—an unmistakable sign things are warming up.
- A shaded path can stay soggy for days after a rain: elevating access with gravel prevents trapped moisture and mud.
- It’s common to find a single long-lived perennial hiding beneath brambles; if it flowers reliably, you’ll feel at home keeping it.
One common anecdote-style moment: gardeners often notice that the first flush of daffodils after clearing feels disproportionately satisfying—small rewards help keep the work going.
FAQ
How long until a neglected garden feels low-maintenance?
Visible access and useful beds usually happen within one season if you install raised beds and prioritize mulch and compost. Soil structure and a real reduction in weeding normally take1–3 seasons with repeated compost applications and mulching.
Can I avoid digging if the soil is compacted?
Yes—no-till approaches like heavy compost top-dressing, broadforking limited beds, and raised beds work well. Very dense clay with poor drainage may still need targeted loosening or subsurface drainage improvements to achieve reliable results.
Which irrigation option is best for mixed beds and edibles?
Drip irrigation zoned separately for beds and shrubs gives the most control: it saves water, reduces foliar disease, and allows you to tailor run times for different water needs. Add basic filters and pressure regulators to prevent emitter clogging.
What’s a cost-effective soil fertility strategy?
Start with a soil test, then add 2–4 inches of mature compost annually. Building a simple compost bin reduces disposal costs and supplies steady organic matter; supplement with a homemade organic liquid feed for quick foliar boosts if needed.
Read Next: Planning Next Season’s Garden the Smart Way
Read Next: How to Create a Rainwater Collection System