Container gardening eliminates the most significant barriers to producing your own food and flowers: you don’t need a yard, you don’t have to deal with poor native soil, and you don’t need a tiller.
However, growing in a pot is fundamentally different than growing in the ground. A container is a contained and isolated ecosystem.
You are exclusively responsible for maintaining the plant’s moisture, nutrients, and temperature. Beginners who fail at container gardening rarely have a “green thumb.”
Typically, they’ve misread the physics of potting soil, selected the incorrect container material, or underestimated how rapidly a pot dries out in the summer wind.
The Anatomy of a Successful Container Setup
A successful container garden relies on three interlocking components: the vessel, the drainage, and the growing medium. If any of these fail, the plant struggles.
Choosing the Right Container: Materials Matter
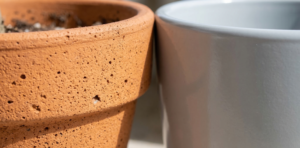
Walk into any garden center, and you will see pots made of plastic, terracotta, glazed ceramic, and fabric. Your choice of material directly dictates how often you will need to water and how hard it will be to move the plant later.
- Plastic and Resin: These are lightweight, retain moisture exceptionally well, and are inexpensive. If you are gardening on a balcony where weight limits are a concern, high-quality resin is your best choice. The downside? Dark plastics absorb heat. A black plastic pot in full afternoon sun can bake plant roots.
- Terracotta (Unglazed Clay): Terracotta breathes. Moisture evaporates through the walls of the pot. This is excellent for plants that hate wet feet (like rosemary or succulents), but it means you will be watering significantly more often during peak summer. Terracotta is also heavy and prone to cracking if left outdoors during winter freezes.
- Fabric (Grow Bags): Made from breathable felt-like materials, grow bags are increasingly popular. When roots reach the edge of a fabric bag, the air exposure stops them from circling (a process called “air pruning”), creating a healthier root system. However, grow bags dry out very quickly and can leave water stains on wooden decks.
- Glazed Ceramic: These combine the weight of terracotta with the moisture retention of plastic. They are primarily decorative and very heavy.
Practical tip: A 20-inch ceramic pot filled with wet potting mix can weigh over 80 pounds. If you plan to move your plants indoors for the winter, put heavy pots on a wheeled caddy before you fill them with dirt.
The Non-Negotiable Rule of Drainage
If a container does not have holes in the bottom, it is not a planter; it is a bucket. Without drainage, water pools at the bottom, suffocating the roots and causing root rot.
If you find a beautiful decorative pot without holes, you have two choices: drill holes in the bottom using a masonry drill bit, or use the “cachepot” method. To do this, plant your greenery in a cheap plastic nursery pot with drainage holes, and slip that plastic pot inside the decorative one. Remove the inner pot when watering, let it drain completely, and put it back.
The “Gravel at the Bottom” Myth
A common piece of old gardening advice suggests putting an inch of gravel at the bottom of a pot without holes to “improve drainage.” Do not do this. Soil physics dictates that water will not move easily from a fine-textured material (soil) into a coarse material (gravel) until the soil is 100% saturated.
By adding gravel, you raise the waterlogged zone (the perched water table) closer to the plant’s roots. Fill the entire pot with your growing medium.
The Dirt on Soil: Why Garden Dirt Kills Potted Plants
Never shovel dirt from your yard into a container. Native ground soil is heavy, contains weed seeds and pathogens, and most importantly, it compacts. Inside the confined space of a pot, garden soil turns into a dense brick that suffocates roots.
You need potting mix.
Notice the word mix, not soil. Most high-quality potting mixes actually contain no soil at all. They are engineered blends designed to balance moisture retention with rapid drainage and aeration.
When shopping for potting mix, look for these three primary ingredients:
- Peat Moss or Coco Coir: This forms the bulk of the mix. It acts as a sponge, holding onto water and nutrients. (Coco coir is the more sustainable, renewable option.
- Perlite: These look like tiny white styrofoam balls, but they are actually expanded volcanic glass. Perlite prevents compaction and ensures water flows through the mix quickly.
- Vermiculite: A flaky mineral that expands when wet, holding onto water and slowly releasing it.
Cost Expectation: Do not buy the absolute cheapest bag of generic potting soil at a discount store; it is often just pulverized bark that will tie up nitrogen as it decomposes, starving your plants. Expect to pay between $10 and $20 for a high-quality 1.5 to 2 cubic-foot bag of mix.
What to Grow: High-Success Plants for First-Timers
Matching the plant to your container size and your sunlight exposure is the key to early success.
Sizing Your Containers
A common beginner mistake is using pots that are too small. Small pots hold less soil, which means they hold less water and dry out rapidly. A 10-inch pot might need watering twice a day in July. Whenever possible, choose larger containers (14 inches in diameter or larger).
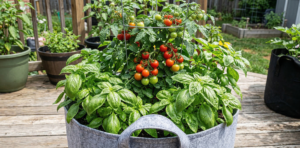
For Sun-Drenched Balconies (6+ hours of direct sun)
- Patio Tomatoes: Standard tomato vines can grow 8 feet tall and require massive 15-gallon pots. Look for “determinate” or “patio” varieties (like ‘Patio Choice’ or ‘Tiny Tim’). They stay compact and thrive in 5-gallon containers.
- Mediterranean Herbs: Basil, rosemary, thyme, and oregano love full sun and tolerate the dry conditions that containers often experience.
- Zinnias and Marigolds: Tough, heat-resistant annual flowers that bloom continuously if you pinch off the dead blooms.
For Shady Patios (Under 4 hours of direct sun)
- Leafy Greens: Spinach, lettuce, and arugula bolt (go to seed and turn bitter) in extreme heat. They do exceptionally well in the cooler, shaded environments of covered patios.
- Mint: Mint is an aggressive spreader that will take over a garden bed. Growing it in a container is actually the recommended way to keep it under control.
- Coleus: Grown for its striking, brightly colored foliage rather than its flowers, coleus thrives in the shade and adds massive visual interest to dull corners.
Watering and Feeding: The Maintenance Reality
Because a container is a closed system, every time you water, a small amount of nutrients washes out through the drainage holes. Furthermore, the limited soil volume means the plant uses up available moisture much faster than it would in the ground.
The Watering Strategy
Do not water on a strict calendar schedule (e.g., “every Tuesday”). Environmental factors change daily. Instead, use the finger test: push your index finger into the soil up to your second knuckle. If it feels dry, it is time to water. If it feels moist, wait.
When you water, water deeply, pour water over the soil surface until it actively runs out the bottom drainage holes. This ensures the entire root ball is saturated and helps flush out accumulated fertilizer salts.
Observation from the field: If the potting mix gets completely bone-dry, it can become hydrophobic (repelling water). You might water it, and the water immediately runs down the inside edges of the pot and out the bottom, trickling over the roots without soaking in.
If this happens, you need to slowly bottom-water the plant by letting it sit in a tray of water for an hour to rehydrate the peat.
The Feeding Strategy
Potting mix is generally sterile. Even if you buy a mix with “added fertilizer,” that fertilizer is usually exhausted within the first 4 to 6 weeks. After that, you must feed the plants.
You have two main options:
- Slow-Release Granules: These are small beads you mix into the top inch of soil. Every time you water, a tiny bit of fertilizer is released. This is the lowest-maintenance option and lasts 2 to 3 months.
- Water-Soluble Fertilizer: Powders or liquids mixed into your watering can. They provide an immediate hit of nutrients but wash through the soil quickly. During peak summer growth, heavy feeders (like tomatoes or petunias) benefit from a diluted water-soluble feed every 1 to 2 weeks.
Common Beginner Mistakes to Avoid
| The Mistake | Why It Happens | The Fix |
| Overcrowding | Buying too many plants at the nursery and trying to squeeze them all into one pot for an “instant full look.” | Read the mature spacing requirements on the plant tag. Give roots room to expand. A 12-inch pot generally holds only 3 small starter plants. |
| Ignoring Wind | High-rise balconies or open decks act like wind tunnels. Wind strips moisture from leaves incredibly fast. | Group pots together so they shelter each other, or choose heavy, low-profile pots that won’t blow over. Water more frequently during windy weeks. |
| Reusing Old Soil | Saving last year’s potting mix to save money. | Old soil is compacted, depleted of nutrients, and may harbor last year’s fungal spores. Dump old mix into a compost bin and start fresh, or at a minimum, amend it with 50% fresh compost and perlite. |
A Simple Starter Project: The “Spaghetti Pot”
If choices paralyze you, start here. This setup requires minimal space, yields highly usable produce, and relies on very forgiving plants.
What you need:
- One 14-inch to 16-inch resin pot with drainage holes.
- One bag of high-quality, soil-less potting mix.
- One “Patio Choice” or “Bush Early Girl” tomato start (nursery seedling, not seeds).
- Two sweet basil starter plants.
- Slow-release granular vegetable fertilizer.
The Process:
- Fill the pot 3/4 full with potting mix. Mix in the recommended dose of slow-release fertilizer according to the package directions.
- Remove the tomato plant from its nursery pot. Dig a deep hole in the center of your container and plant the tomato deep—bury the stem right up to its bottom set of leaves. (Tomatoes grow roots along their buried stems, making them stronger).
- Plant the two basil plants near the edge of the pot, spaced equally apart. Basil and tomatoes are excellent companion plants; they like the same water and sun conditions.
- Fill in the remaining gaps with potting mix, leaving about an inch of space between the soil line and the rim of the pot so water doesn’t overflow.
- Water thoroughly until it drains out the bottom. Place in a spot that receives at least 6 hours of direct sun.
Starting with a small, high-yield container like this allows you to rapidly understand the rhythm of watering and feeding. Container gardening is incredibly adjustable; begin small, pay attention to how your soil feels, and gradually increase as your confidence builds.